Age 5: The Ender Age
You may have breezed through the last 3 ages, but age 5 is going to be different. There is a lot to do here, and it may easily take as much time as the first 5 ages combined.
Some things you need to be looking for from the beginning: villages (for emeralds), slime islands, and mob heads (especially enderman heads). If you are playing on an established server, finding a village with villagers still alive, and a slime island that still has many blocks of slime may be difficult.
Another option for Emeralds is to mine for them in extreme hills or extreme hills plus biomes. Emeralds are found there in the same y-levels as diamonds.
We will need to go to The End dimension for this age, so it is worth taking time to make some good armor. While we are traveling to the end, it may be worth it to find an elytra to enable true flight (by way of jetpack), so it should be obvious now why this age frequently takes so long!
In addition to this, we are going to need many machine chassis for our new machines, so we will need to greatly increase our power capabilities so that we can use our empowerer for large recipes. So, we will be spending a lot of time mining for all the materials we need for such equipment.
The first task is the alloy smelter, because it is needed for many of the other tasks. After that, the order that you follow is kind of up to you. There will be a few steps that you can't 100% complete in the order that I give, for example, 5.1 is the conduits, but one type of conduit (redstone) isn't available until after you have made a Forestry centrifuge, which is listed later.
Task 5.0: Alloy Smelter
Once you have this, you can make Quartz Glass, which is useful for making the Reservoir, a device that can provide your machines with unlimited water, and for making pressurized conduits. You can also now make Soularium, which allow us to make the metal press, and many other goodies from EnderIO. Here's those recipes:
If you play around with the alloy smelter a bit, you can see that it it can be restricted to only make alloys, or only smelt ores.
I think it's worth having 2 or 3 alloy smelters around, and have them on different settings. Then you can use conduits to automate how your materials are processed. Send ores into the furnace-restricted alloy smelter, and you won't need to worry about two metals going in at once and being turned into an alloy.
Task 5.1: Extraction Chamber (for circuits)
Circuits can be used for a lot of things. Most of them are optional, but there are almost certainly some that are mandatory. Creating them is very slow, so it is worth starting it now. They also take a lot of power, so for now, we are going to do the first step. Even if it can't be run 100% of the time, running it a little will make a bit of stone dust, which is very useful for making conduits.
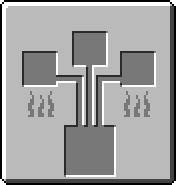
First, make some weakened diamonds using your algorithm separator, and then use those to make an extraction chamber:
Take a stack of cobblestone, and set it inside, and just wait for it to work. If you are in a hurry, there are upgrades to make it work faster, but by starting it early, you shouldn't need to do that. For each cobblestone processed, you have a 12.5% chance of getting some kind of circuit.
Unfortunately, once it gets one circuit, it stops. So, I'd recommend making a Wrench (Calculator), then digging down below your extraction chamber, and right click on the bottom face to turn it red (which means output). Put a hopper there, and have it send output to a nearby chest. Feel free to put a hopper above it also for inputting cobblestone.
There is a bug with this device that makes it stop running if it can't fill entirely with power, and this seems to happen if you power it with connectors from Immersive engineering. Mine tends to get to 39,995, and then stop. To fix this, you need to use Energy Conduit to deliver power to the extraction chamber (instead of the Wired Connector). Alternative, I believe an energy laser relay can work well for powering calculator machines.
What I did is place one block of Energy conduit on top, and then place a wired connector off the side of the block of conduit. After doing this, it no longer gets stuck.
In addition to running cobblestone through your extraction chamber, you'll also want to run dirt through it to make dirty circuits. You could do cobblestone now, then switch to dirt later. Eventually, you'll probably want to make 2 extraction chambers, and dedicate one to cobblestone and one to dirt. The outputs of these machines do not stack, so I'd recommend making a saparate crate for storage from each extraction chamber. Eventually you'll get machines that can clean your circuits, and at that point, they can be easily stored in a drawer array.
I'm a big fan of automation, so I'm making conduits the next thing on our Age 5 list.
Task 5.2: Conduits, conduits, conduits
In most modpacks today, there are multiple options for how to move things around, and AoE is no exception. I have settled on conduits when possible for 4 big reasons:
* You can have conduits of multiple types (item, pressurized fluid, redstone, energy) all in the same block, and they won't interfere with each other
* Item conduits and redstone conduits have multiple channels, so you can have multiple pathways in one block by only placing one conduit.
* Conduits can be set to not connect to conduits in the next block over, and no painting is required.
* Where conduits meet machines, you can set them to only insert or only extract.  This reduces the load on the server, and reduces the chance of something going wrong.
Conduit binder is annoying to make, but it's cheap, so it's worth making 6-8 stacks of it at once:
Note: stone dust can be replaced by Small Stone (Calculator), which is a waste product of the Extraction Chamber.
- Main article: Age of Engineering
If you have a little CF Powder leftover, keep it. You can use it in age 7, if you want to use a CF sprayer to make reinforced stone for your nuclear generators.
If you have an alloy furnace and conduit binder, you should be able to make 3 types of conduits. The 4th below (Redstone conduits) will also require a [Centrifuge (Forestry)] to make the silicon for the redstone alloy.
The energy conduits require ender pearls. If you don't have a good way to farm these yet, then don't worry about them yet.
In addition to all the conduits, also make a Yeta Wrench. When viewing it in your inventory, hold down shift to see instructions on how to use it. I use mine the most when trying to adjust a conduit that connects to the bottom of a machine. You could dig down into the floor so that you can click with an empty hand on the connection pad, but it is easier to just shift-left click the node itself with a yeta wrench.
Task 5.3: Garden Cloche (optional)
This step is marked as optional, but it will make it much easier to get large quantities of seeds, because it can grow canola extremely fast. Thus, I would say that it is highly recommended.
Advanced Greenhouse
For this, you will need to make another Basic Greenhouse. You could dismantle and use the one from before if you are sure you have enough coal dust from it already.
You will use your algorithm separator to make the tanzanite.
Don't place your large greenhouse yet. Save it to make the farmer.
Farmer
Don't place your farmer yet, save it to make the garden cloche.
Reservoir
If you have played a lot of 1.12 packs, you probably know this item as an "Endervoir", but in 1.10, it is still called a "Reservoir".
The garden cloche can be built in age 4, but I have it here primarily because the easiest way to generate water for it is a reservoir, which requires an alloy smelter. It's not a bad idea to build the garden cloche in age 4, but you will need to restock the water for it manually.
The garden cloche is also useful for your carpenter. If you made 2 carpenters, you can have one filled with water constantly from your reservoir, and use the other for anything else (eg. seed oil).
Place the 4 reservoir blocks in a 2x2 grid (can be vertical if you wish), then fill two opposite corners with water (using water bucket). They will give an infinite water source.
Now, make both a Transfer Pipe, and a Transfer Node (fluid). It can pull water from your reservoir to go into your Garden Cloche.
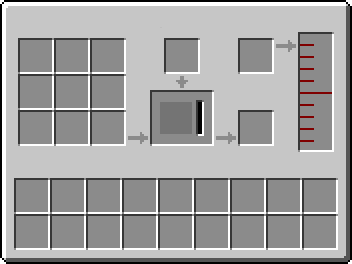
Garden Cloche assembly
Bring in power from the top, and water from the bottom. In the UI, place soil in the bottom square and canola seeds in the top square. Then, exit the UI, and attach a chest directly onto the node in the middle block of the 3 blocks. Your output will go in there.
Task 5.4: Travel Anchors
If you are like me, this is about the point that you will need to expand your base. Do you have multiple floors? Do you want to jump through walls? If so, it is time to make Travel Anchors, and a Staff of Traveling.
These are a huge quality of life improvement, so I recommend doing it, even if the recipes look a bit expensive. Travel anchors that are placed vertically can be used like elevators. The staff of traveling can be used to jump to any travel anchor, over a very large distance, for just a small amount of power.
A capacitor bank from EnderIO can be used for charging your staff. Better yet, a battery from actually additions held in your inventory can recharge your staff as you use it, and it can be recharged in a capacitor bank. There is an upcoming task for these items.
Task 5.5: Metal Press
A Metal Press is not very expensive, and it will make it cheaper to make Bronze Gears, which is going to be nice considering how many Sturdy Casings we need to make now. After following these recipes, you will have enough to make 2 metal presses. There are three metal press templates that we will want: Gears, plates, and wires. So, if you have the space in your factory, you may want to just make 3.
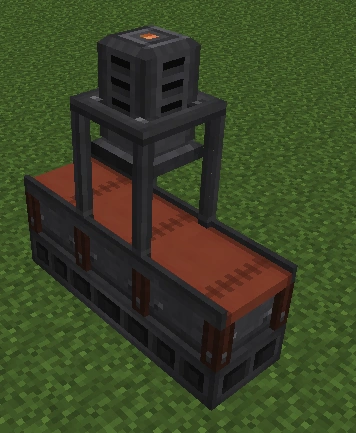
Construction
The Metal Press is relatively simple to make. It uses:
- 2
Steel Scaffoldings - 1
Redstone Engineering Block - 1
Piston - 1
Heavy Engineering Block - 2
Conveyor Belts
The orientation the Conveyor Belts are in is important; one should be facing into the Piston and one should be pointed the opposite way, away from the Piston. The orientation of Piston also matters; it should be facing down, as if it is to push the Redstone Engineering Block.
After it is fully arranged, shift right-click the left or right side of the Piston with an Engineer's Hammer to complete the multiblock.
Task 5.6: Canola oil for power
Canola press and fermenting barrels
We are going to begin to need a lot more power now, so it's time to get the canola presses going. Make a press and couple barrels, and place all three along with an ender IO tank into a 2x2 square:
The press will take your Canola, and make Canola oil, which will go to the barrels, which change it to basic oil, which can then be pulled from the Ender IO tank.
If space is not an issue, you can keep 3 barrels going from one canola press, and then use them to power 3 oil generators.
Oil Generator
Place this next to the ender IO tank, and have the tank push into the generator. You can probably keep 3 of these generators going at once. This will make lots of power!
If you are really ambitious, then you can use transfer pipes to take your canola directly from the garden cloche to the canola press. If you have more than 2 going, then you may need to move the oil further than just one block. If this is the case, use pressured fluid conduit instead of a fluid tank.
The amount of RF from a bucket of [Oil (Actually Additions|Oil] is 120. You can increase this to 280 by crystallizing the oil. To do this, place the oil in world, drop in a crystallized canola seed, and then pick the [Crystallized Oil ]back up.
The amount of RF can be increased again to 400 by placing crystalized oil in the world, dropping an empowered canola seed in, and picking it up. This makes [Empowered Oil]
These extra steps can be automated using
Task 5.7: Other optional fuel sources
Canola seems to be the favorite method for generating power in age 5, but there are other options, such as ethanol.
Task 5.8: Experience Obelisk (optional)
This is purely optional, and is quite expensive, but it is nice to be able to push and pull experience into this, so you won't lose it all on deaths:
In addition to not losing experience on deaths, you will waste far less experience when you enchant things now, so this is highly recommended.
Task 5.x: Centrifuge (Forestry)
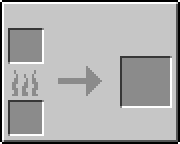
This is fairly simple to make, and you'll need it to make silicon from silicon dioxide:
Task 5.x: Vibrant Capacitor Bank
The Vibrant Capacitor Bank can hold 25,000,000 Rf, and has an interface that can be used for charging armor, weapons, drills, etc. We will be using a lot more power soon, so it is time to make one.
Either recipe will work, but I usually find the first one to be easier, because it contains less single capacitors.
For the electrical steel, you will need to make silicon, using the Forestry centrifuge.
Task 5.9: Dark Steel armor (optional)
Now that we have an alloy smelter, we can get new armor, which will be very useful for going to The End:
Use these ingots to make a full set of armor. The non-enchanted versions are similar to iron, but you can put some great enchantments on them. Shift click to see the enchants possible.
Make a vanilla anvil to apply enchants.
For all 4 pieces you will want to enchant them first with a Vibrant Crystal and 4 levels of experience, followed by a Basic Capacitor and 6 levels of experience. If desired, you can enchant further with a Double-Layer Capacitor, followed by an Octadic Capacitor.
After these enchants, you will want to add Glider Wings to the Dark Plate (chest piece]], a Speed Potion to the Dark Leggings, and no fall damage to the Dark Boots. If you wish, you can add a Solar Panel to the Dark Helm.
It is also recommended to make The Ender as a sword, if you haven't found one already, and a Dark Bow for a weapon. The sword is useful for getting mobs to drop heads (especially endermen), and the bow can be enchanted with Power V, and has an infinite supply of arrows, so it is a great weapon for fighting the ender dragon.
To make all of these, I believe you will need 27 dark iron. Dark iron takes a long time to make, so set it up, and then go mining.
Task 5.10: Mob spawners (optional)
Going to The End and taking [The Ender] is a good way to get enderman heads and enderpearls, but sometimes you want your own spawner at home. I ended up making two rooms for powered spawners in my base. One was used for enderman, and the other for blazes.
Slice'N'Splice
The Slice'N'Splice is needed for making Z-Logic controllers, which are important for making some of the EnderIO filters, and also for making things such as powered spawners:
Soul Binder
If you have found any dungeons or mineshafts, and broken the spawners and saved the scraps, good news, we can change them to create the creatures that we don't see often enough (ie. Endermen). To change what type of spawner you have, you will need to make a Soul Binder:
Next, make a Soul Vial and click it on the enemy whose soul you wish to capture. Take a brokne spawner and the filled soul vial, and place them in the soul binder to change the spawn type.
Next make a Powered Spawner:
Finally, place the broken spawner and the powered spawner together in a vanilla anvil to get a powered spawner of the type you want. Hook it up to power, and you have the most important part of a mob farm!
Task 5.11: New mining bags
Item Filter (Actually Additions)
Place in the item filter all the items you don't want to pick up (Andesite, dirt, cobblestone, arrows, etc.). Then use it as a whitelist for your void sack, and a black list for your traveler's sack.
In the void sack, there is a red I in the top left of the interface. Click it to turn it green. Now, anything you pick up that matches the white list will instantly be destroyed.
The traveler's sack can also be set to auto pick up, but it doesn't always work if it is in your hotbar (not sure if this is a bug, or if working as intended). When you are done mining, place the traveler's sack in your hand, and shift click a chest to automatically empty everything from it into the chest. If you have that chest as the start of a long automation queue, this feature is extremely handy!
Task 5.12: Quadruple Battery
You made a double battery early, and then used to craft your empowerer. These batteries can be held in your inventory, and when you do, your armor, weapons, etc. will be filled from it.
You can upgrade the double battery as far as a Quintuple Battery. I recommend going at least as far as Quadruple Battery, which is able to hold 8,000,000 Rf -- enough to keep your stuff charged for a long time!
Task 5.x: The End (Chorus Fruit)
Take a trip to the end, and harvest some chorus fruit. You will need it for nutritient distillation.
Task 5.x: The Vat
This will be needed late for rocket fuel, but for now its main purpose will be to make nutrient distillation:
Task 5.x Machine Frame
The Machine Frame (RFTools) will be needed for nearly everything in age 6. This is the last thing you need to get to age 6 also: